2008-04-01, 22:05
|
Link #683 | ||
|
Hina is my goddess
 Graphic Designer Graphic DesignerJoin Date: Dec 2005
|
Hi everyone. I'm a complete noob when it comes to gifs and ive been following Cats' guide but now am stuck and need a little help. I've got virtual dub and image ready and am able to grab the frames fine. My problem comes in turing those frames into a gif.
My first problem is adding a border. Quote:
I cant seem to be able to do that. i can add a new layer but i cant access stroke Spoiler:
My next problem is saving. i dont see the function Cats is refering to Quote:
Spoiler:
Also, how do i change the length of time the frames stay up? AKA, changing the delay/speed of the gif Thanks for all your help. |
||

|

|
|
2008-04-01, 22:15
|
Link #684 | |
|
Life's better in a harem.
Graphic DesignerJoin Date: Dec 2007
Location: Oakville, Ontario, Canada
|
Quote:
And to change the length of time for each frame, you just need to change the # of seconds under each frame. Here's a picture just in case:  I'm not too sure about the border so I can't really be of help.
__________________
|
|
|
|
|
|
2008-04-01, 22:20
|
Link #685 | |
|
Hina is my goddess
Graphic DesignerJoin Date: Dec 2005
|
Quote:
Sorry, i also want to add, is there any way to reduce my file size easily? AKA reduce image quality? Last edited by SeedFreedom; 2008-04-01 at 23:13. |
|
|
|
|
|
2008-04-02, 05:39
|
Link #686 | |
|
sleepyhead
AuthorJoin Date: Dec 2005
Location: event horizon
|
Quote:
The reason you don't see Save for web... is because you're skipped a few steps and are still in ImageReady instead of Photoshop.  (warned you it was the complicated version) For optimizing try the check list and tutorials on the first page. (Section B)
__________________
|
|
|
|
|
|
2008-04-02, 22:21
|
Link #688 |
|
Procrastinator
Join Date: Jul 2007
Location: California
Age: 33
|
Hi I have a question on animated sigs. Every single time I make an animated sig, the quality goes down like crap once I try to optimize it, even with the best settings. I've heard (probably on Riker's thread) that you can save the sig into parts to save quality. I don't quite understand it so if anyone can explain it to me, I'll appreciate it very much.

__________________
|
|
|
|
|
2008-04-02, 23:13
|
Link #689 | |
|
Peek a boo
Graphic DesignerJoin Date: Dec 2005
|
Quote:
  For example, this sig is cut up into 2 parts. The left portion, which is static and does not require any animation, is saved as a JPG. You can do this by using the Slice Tool in Photoshop to divide your sig into smaller sections. |
|
|
|
|
|
2008-04-02, 23:51
|
Link #691 |
|
Black Dragon
Graphic DesignerJoin Date: Dec 2007
Location: In the Netherrealm, thinking who to betray next...
|
Hi it's your friend Evil Rick again, I have some problems trying to add a gif to my current Avatar
 this is my avatar (JPG format) this is my avatar (JPG format)  this is the gif this is the gifWhen I put the gif in the Avatar and save it, the gif transform into JPG too, plus I can't inport the gif to Photoshop. Anyone can help me?
__________________
|
|
|
|
|
2008-04-03, 00:49
|
Link #692 | |
|
Thinking outside the box
Graphic DesignerJoin Date: May 2007
Location: The Netherlands
Age: 37
|
Quote:
Additionally you can increase the canvas size from 65px(gif) to 100px(jpeg). This is what you should get 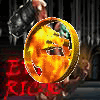 (size is to big to be used on AnimeSuki) Didn't bother with optimizing it. Though i doubt it can be made within Animesuki rules without shrinking it or totally butchering the quality.
__________________
|
|
|
|
|
|
2008-04-03, 16:53
|
Link #695 | |
|
I LOVE FLAN_CHAN
Graphic DesignerJoin Date: Oct 2007
Location: Flan-chan
Age: 21
 |
Quote:
Edit: I got my question answered. Oh and it is not any of those your listed.
__________________
Last edited by Izayoi; 2008-04-03 at 19:32. |
|
|
|
|
|
2008-04-03, 22:05
|
Link #696 | |
|
Black Dragon
Graphic DesignerJoin Date: Dec 2007
Location: In the Netherrealm, thinking who to betray next...
|
Quote:
I will give a try and then I'll come back LMAO
__________________
|
|
|
|
|
|
2008-04-05, 18:56
|
Link #697 | |
|
Not an expert on things
Join Date: Jun 2007
|
Quote:
1. Create new layer. 2. Fill with random color. 3. Set Fill to 0% 4. Go to Blending Options [Double-click the layer] and find "Stroke." 5. Set "Position" to "Inside" 6. Tweak settings. Or you can: 1. Create new layer. 2. Fill with color of border. 3. Select All. 4. Go to "Select" on the menu bar, find "Modify", and click "Border". 5. Set pixels. 6. Clear/Delete selection. The first option will create a solid border. The second option will create a border that fades in [can also be done with the first option, except by replacing "Stroke" with "Inner Glow"]. Setsilya, I'm curious as to what the answer is. |
|
|
|
|
|
2008-04-05, 19:21
|
Link #698 | |
|
Peek a boo
Graphic DesignerJoin Date: Dec 2005
|
Quote:
|
|
|
|
|
|
2008-04-05, 19:56
|
Link #699 |
|
Not an expert on things
Join Date: Jun 2007
|
Is there anything about this program that makes it superior to Illustrator or Photoshop?
Edit: I just watched some videos of it on Youtube. It looks amazing, but you can't disregard the skill level of these people. Last edited by OceanBlue; 2008-04-05 at 20:14. |
|
|
|
 |
| Tags |
| avatar, graphic, photoshop, signature |
|
|