Signature Lighting Tutorial
For Photoshop CS3 and CS4
Okay people, a few of you have been nicely commenting on the lighting in my signatures, so I thought I'd make a tutorial. It's my first attempt at something like this, so apologies if some parts are explained well enough. I've decided to make the tutorial accessible to users of all skill levels, so if you're a veteran, expect some easy parts.
Anyways, in this tutorial you will learn about render lighting, as well as some decent gradient maps to add that *zap!* to your sig. After you finish with the tut and have create a sig with it, feel free to post your outcomes in my thread here. It would be great to see what some of you can come up with.
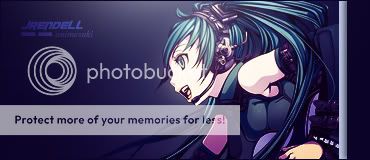
I will be using the above signature to demonstrate, so expect an outcome somewhat similar. Good luck.
__________________
Step 1
Open up a blank canvas. All of my signatures are at 370x160, but you can use whatever size you want. Make sure the background is set to
Transparent and the resolution at
72.
 Step 2
Pick your render and insert it into the document. Resize it to however you see fit using
Transform. A good tip I learnt is to hold 'Shift' when resizing, as it keeps both the height and the width the same, stopping the image from becoming squashed/stretched. The render should be on a separate layer and you should now have two layers.
.
 Step 3
Pick two colours from your render. One should be a lighter colour and the other a darker. Make sure that your lighter colour is set as the foreground colour. Now, select the gradient tool, and set it to
Radial Gradient. On your 'bg' layer which should be beneath the render layer, draw from the bottom of the canvas to around the top, aiming for it to be just to the side of the render. See the image if you don't understand.

.

 Step 4
Create a new layer and rename it to 'lighting'. Using the 'Paint Bucket' tool, default [G], fill this layer completely black, then set it's opacity to
70%. This layer should be above all others. Now get out some 'Basic Bushes' and select a
Soft Brush at
80px. Hide the 'lighting' layer and now select the 'Eye Dropper' tool, default [I]. Once again select a bright colour from your render, not necessarily the same as before, but it doesn't matter. Now unhide the 'lighting' layer and get out you brush. Right now, it should look something like this.
 Step 5
Still on the same layer with your brush selected, brush where you want light to be. Try to keep the brushing over the top of the render, as this is what we want to add light to. The aim of this layer is to create some artificial light, and we will add the source of that later, so consider this when brushing. Below you can see what I did.
 Step 6
Now that you have added the brushes, set the 'lighting' layer to
Linear Dodge and at
40% Opacity.
.
 Step 7
Create a new layer and rename it to 'burned'. Now go to 'Image' then 'Apply Image' (you may have to click 'Show All Menu Items in order to see this). Now select your burn tool and set it's size to a
Soft Brush at
300px. The 'Range' should be on
Midtones and the 'Exposure' at
20%. Now, as if brushing, brush over the 'burned' layer. Note: try not to brush over where you want the lighting/light source to be. The aim of this layer is to darken the rest of the image so that attention is brought to the lighting and render. See below for what I did.
 Step 8
Just like what we did in 'Step 7', create a new layer and Apply Image. Rename this layer to 'b/w gradient map'. Now hit
Shift + D to set your foreground and background colours to default (black + white). Then, still on the 'b/w gradient map' layer, go to 'Image', 'Adjustments' and then 'Gradient Map'. Don't change any of the colours as they should already be black and white. Hit 'OK'. Set this layers opacity to
30%.
.
 Step 9
Repeat 'Step 8', however set your foreground colour to
#4300A7 and your background colour to
#E66700. Rename this layer to 'p/o gradient map'. Set this layer to
Soft Light. I kept the opacity at
100%, however it depends on your render as to what will look better, so set at whatever opacity you wish.

.

.
 Step 10
Note:
Step 10
Note: This step is optional. Once again create a new layer and apply it. Then go to 'Filter', 'Sharpen' and then 'Sharpen'. I decided against doing this, but on other signatures I have created using this tutorial, I have carried out this step.
Step 11
Create a new layer. Get out your brushes again, but set the size to a
Soft Brush at
300px. Wherever you brush is going to become the 'Light Source', so take this into consideration. I brushed at the top of the image. Rename the layer to 'light source'. See below.
 Step 12
Add a border, some shapes and some text, and bob's yer uncle.
__________________
Thanks for reading and I hope this is of some benefit to some of you!

All you have to do now is post the outcomes
here. Post up if you are stuck or don't understand anything, or if you want to make a suggestion.
Peace out,
JR~