 2006-03-29, 22:56
|
Link #81 |
|
Kira_Naruto, the ecchi
 Graphic Designer Graphic DesignerJoin Date: Dec 2005
Location: http://www.exciting-tits.com/
|
o.o.. you learning to make your own o.o
OK... how to put border.. the simplest step is make a new layer.. make sure that its the toppest layer .... then select all... you should see the marching ant around the image. Simply go to Edit->Stroke ^^ Text blending in the BG.. simplest one ... lower the opacity and change the blending option for the text layer ... both can be find on the layer window 
__________________
|

|

|
|
2006-03-30, 08:46
|
Link #82 |
|
sleepyhead
AuthorJoin Date: Dec 2005
Location: event horizon
|
Part I ~ Round Edges
Briefing Example used... We'll start with a Haruka Armitage sequence: Start-Screeny Steps What you need to do...
After you've clicked it your img should have rounded borders. Finishing Notes Bla bla bla... Notice that the layer mask has filtered down to all the frames, just resize it, save the most efficient optimized version and it's done. Victory!!!  Part II ~ Round Border Briefing What-what... Since some people might want to add a stroke, this is how it's done. After you finished the steps above, start continue with the steps bellow. Steps Time to rumble & bable...
Finishing Notes Teh End... Well that wasn't so hard it wasn't ground breaking earth shaking stuff anyway.  
__________________
Last edited by felix; 2007-02-02 at 14:08. Reason: Reved & QC. |
|
|
|
|
2006-03-30, 16:11
|
Link #85 | |
|
Peek a boo
Graphic DesignerJoin Date: Dec 2005
|
Quote:
|
|
|
|
|
|
2006-03-31, 11:18
|
Link #86 |
|
sleepyhead
AuthorJoin Date: Dec 2005
Location: event horizon
|
Ok ... I seem to be strugeling with some border designes ...
To make something like this :  I just create consecutive groups each containing oneanother and create difrent masks for each, ending up with the disign I want ... however there is a limitation of only 5 groups... basicly limiting my creative side  My question is how do I merge selections ? so that I will only nead to use just one layer mask. Of course I could draw the selection but it would be better if I could use some of the tools to crate nice little circles and other stuff.
__________________
|
|
|
|
|
2006-03-31, 15:05
|
Link #87 |
|
~Nanchatte Renai
ScanlatorJoin Date: Mar 2006
Location: Australia
Age: 30
|
Question for BlackCat ok so I've got the round borders trick but still confused when i make the borders and stroke them this is how it turns out
 Also when i put the mask on this is what the round borders look like http://img306.imageshack.us/img306/7...tled1hj0fa.gif Think you can help me
__________________
|
|
|
|
|
2006-03-31, 21:06
|
Link #89 | |
|
I am mowing clowns
Join Date: Dec 2005
|
Quote:
PhotoShop Resize: Image > Image Size...  ImageReady Resize: Image > Image Size... 
|
|
|
|
|
|
2006-04-01, 00:42
|
Link #92 |
|
......
Join Date: Dec 2004
Age: 37
|
Short-cut Tutorial :
Hmm... So many Tutorial, they can be handy.. though can you remember them all?
For people who dont know about them, Short-cuts are really! Cool!!  to cool for some people to cool for some people //The Action tab which you use, is located right next to the Layers tab// You cant! miss it. If you Do please PM me and you will get some well needed help.... -> Click : Create new action Spoiler:
-> Click Record: Right now it is recording nearly every action you make in image ready, so only do what you want to record. ( if you make a mistake, there is a delete button next the [Create new action] you can use. Spoiler:
-> Crtl + A -> EDIT -> Stroke -> 1 px black Spoiler:
Spoiler:
Now! When ever you want to, use a 1 black px border all you have to do is press -> Crt + Shift + F10 ( Though You can asign it to just pressing [ F2 ] which is alot easier ) Very! simple Tutorial, should be Idoit Proof, if I made it Clear. I think Catgirls might have made some quick tut. on it else-where but cant find it >.> Anyway Go cRazy with Short-cuts now! Needless to say.. if you didn't get anything from this, you will learn but one! thing Dont! piss Kenshin off. |
|
|
|
|
2006-04-01, 02:49
|
Link #93 |
|
sleepyhead
AuthorJoin Date: Dec 2005
Location: event horizon
|
Briefing
The problem... We can make simple cyrcles, squares etc mm.. but what if we want to make a more complex shape for example. Why?!.. To use it as a border for example: --------------  -------------- Method The How To... Everything is very straight forward and is done with Photoshop/ImageReady's integrated features. Before continuing make sure you have an understanding of how to add a rounded border. If you don't, read: Making Rounded Borders. The key lies in making the selection. When you make a normal selection you'll notice that if you try to make it again the previous selection is deleted and replaced by the new one. This is do to the settings in the status bar located right bellow the main menu bar. -------------------------------------------------------------------------- Spoiler for The Status-Bar:
There are 4 settings. The initial default setting is New Selection. You can see it highlighted above. The Settings What does what... They are as follows from left to right:
-------------------------------------------------------------------------- Spoiler for Replies:
__________________
Last edited by felix; 2007-02-03 at 08:10. Reason: Reved QC. |
|
|
|
|
2006-04-03, 09:30
|
Link #94 | |
|
sleepyhead
AuthorJoin Date: Dec 2005
Location: event horizon
|
Briefing
What is... This is a turorial on how to optimize the .gif file format. Note: gif is read: jif This tutorial the direct integrated settings in ImageReady & Photoshop. You can find techniques to optimize the resulting animation in other tutorials. For example this Advanced Optimization Tutorial by Riker In this tutorial we will start with something like this. -------------------------------------------------------------------------- Spoiler for Start-Windows:
I've grouped some of the windows togheter for a better view, you should be able to recognize them. If you don't then look at the image bellow and make sure you have the same selected. -------------------------------------------------------------------------- Spoiler for The-Windows-Menu:
Where should I Optimize my jifs Hmm... In practice most of the time it makes no diffrence. Theoreticly ImageReady would be the best choise since you may delete things like frames, change timing, run the animation while still in optimize mode. Note: If you're a begginer and have trouble with the above try ImageReady. Starting-Off in ImageReady Doing it in ImageReady... Click on the Optimize Tab in the pallet (window) from the right of the main image-window, and then on the Optimized, 2-up or 4-up in the main-image-window. You should have something like... -------------------------------------------------------------------------- Spoiler for Example-Output:
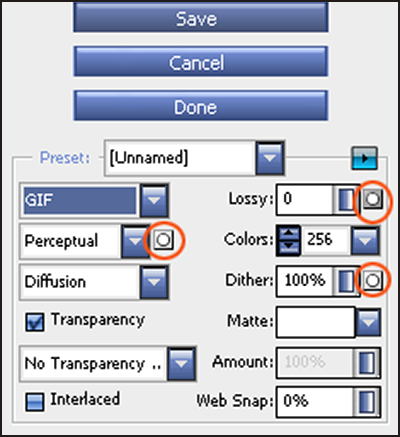
NotesThis about covers what you need to do in IR to get started move on to The Settings title. Starting-Off in Photoshop Doing it in Photoshop... It's quite simple. You go File » Save for web.... Then click the 4-up tab, preferably~ A dialog box resembling the Optimize Pallet in IR should appear. Now just move on to the next title. The Settings In the Optimize Pallet... Before you continue make sure you have format set to: GIF Now how do we get a jif under 50Kb Mmm...Open all 4 drop downs: Color Table, Dither, Transprency, Options Static Stuff Just leave them like I say bellow.
The Works Down and Dirty business... In the Optimize Pallet there are 4 points of intrest. Do note that optimizing doesn't mean we intent to make the image smaller while sheeterizing quality.
Other Optimizing Notes Answers, Tips & Tricks Q. When can I optimize it to 50k?
Downsampling Settings When you're downsampling a image.. uhh?!.. ok sorry, when you're resizing an image to a smaller size in px dimentions, yes concerning that there are a few boring things you should be aware of. The Contrast Trick63,623 bytes - Nearest Neighbor Notice how in the exampels above the colors have been lightened or darkened by a lot. Well by doing this I've eliminated a lot of colors making it smaller. Playing with Levels/Curves (both do the same thing) or with other settings will generally produce a better image while also producing a smaller one. Frame Capture When you capture your frames try to save them at the highest quality posible. This will prevent artifacts, and produce solid colors. The more 'solid' the colors in your image are over the course of the animation the better. If you encounter problems when loading them in ImageReady try routing them out early, before going to image ready by going to the folder they are saved in and using the film-strip display mode deleting the duplicates. Timing You may find that after you've deleted a lot of frames, the timing is screwed. Well it happens. The way to preserve the original timing is this. First select all the frames and set the timing to .01 then start chopping frames off, only for each remember to count them and add the timing to the last one. For example if you have 3 duplicates you would delete 2 and add .02 to the 3rd, so it would have .03 Rememer not to delete key frames. Key frames are the start and end point in an animation they generally have a little longer pause or are higher quality then tween frames (the ones inbetween key-frames). Deleting key-frames is never good... NEVER When deleting tween frames delete either the 2nd or the 3rd for example in the sequence: 1 2 3 4 5 6 7 8 9 you are advised to delete frames 2 4 6 8 or 3 6 9. This way the flow of the animation isn't disturbed. Final Note The awfull truth... Many people seem to believe that the Resolution of the image, as in the ppi (that you can change in Image » Image Size) actually makes a diffrence in quality. Well it got me going for a while, but apparently other then the quality of the printed out versions it doesn't effect web quality at all. You can mess with it, but you're wasting your time. Pixels per Inche (ppi) are only for printers.
__________________
Last edited by felix; 2007-04-07 at 13:44. Reason: Moved -Quick Check List- to Main Index. |
|
|
|
|
|
2006-04-03, 09:52
|
Link #95 |
|
Kira_Naruto, the ecchi
Graphic DesignerJoin Date: Dec 2005
Location: http://www.exciting-tits.com/
|
If you used a lot of transparent av, its wise to set matte to none, or else, you get some white specks in the transparent area.
Another manual choice to drop the size is use the dithering amount, even the automate option used different dithering amount. Another one is the lossy option, if you are short of 1 or 2 Kb from your intended size (50Kb) use lossy option to tone down the filesize, you lost a bit of quality, but if you end up using higher amount then 10 for lossy, try something else, keep lossy amount as the last option to trim down filesize
__________________
|
|
|
|
|
2006-04-03, 13:40
|
Link #97 |
|
Member
Join Date: Feb 2004
|
Great tutorials
 It was of great help to a beginner like me. One question about avatar borders: I just knew how to make simple avatars out of screenshots, and I wanted to add a simple border round it (like those I see around). How can I make/put in borders like the one in my avatar? Or I have to DL brushes for it? (I can't seem to find simple borders....)Thanks in advamce It was of great help to a beginner like me. One question about avatar borders: I just knew how to make simple avatars out of screenshots, and I wanted to add a simple border round it (like those I see around). How can I make/put in borders like the one in my avatar? Or I have to DL brushes for it? (I can't seem to find simple borders....)Thanks in advamce
|
|
|
|
|
2006-04-04, 03:25
|
Link #99 |
|
~Nanchatte Renai
ScanlatorJoin Date: Mar 2006
Location: Australia
Age: 30
|
Ok ok well I thought I might make this clearer ok this is for people like Catgirl,Riker etc.
Well I do everything Blackcat had up there for the round boreds and then I'll show you what i do well really what happens will I'm making it #1 after croping grouping and selecting them all it's like this  #2 Now when i put the round m. tool on and mask it it is this  So really sometimes if i do the borders it will do this  So without a border it is like this 
__________________
|
|
|
|
|
2006-04-04, 06:33
|
Link #100 | |
|
sleepyhead
AuthorJoin Date: Dec 2005
Location: event horizon
|
Quote:
Spoiler for Compariosn 25px vs 0px:
__________________
|
|
|
|
|
 |
| Tags |
| avatar, graphic, photoshop, signature |
|
|


 love the girl CG.... who is she?
  Sorry
Sorry


 .
.  .
. 
 .
. 
 .
.  .
.  .
.  .
. 
")


