2007-08-12, 17:29
|
Link #482 | |
|
~ You're dead ^__^* ~
 Graphic Designer Graphic DesignerJoin Date: Apr 2006
Location: uk, England
Age: 34
 |
Quote:
 do you see on the bottom right side you have a slide called background? that box contains your layers and if you notice a padlock on it then it means that layer is locked and limited from some edit functions ~ what you have to do here is go to layer>>>duplicate later now you would see that there is a new background layer on top of your original without the padlock ~ this is the layer which you can work with so just delete your base (original layer) and you are on your way :3
__________________
|
|

|

|
|
2007-08-13, 00:12
|
Link #484 | |
|
Kira_Naruto, the ecchi
Graphic DesignerJoin Date: Dec 2005
Location: http://www.exciting-tits.com/
|
Quote:

__________________
|
|
|
|
|
|
2007-08-26, 21:53
|
Link #487 |
|
♥Sebastian's new wife♥
ArtistJoin Date: Aug 2006
Location: USA
Age: 31
 |
@Green2: Can you reupload the pictures again for this tutorial because they don't seem to work >,<.
Thanks! http://forums.animesuki.com/showpost.php?p=326196
__________________
|
|
|
|
|
2007-09-01, 04:20
|
Link #488 |
|
Undefined

Join Date: May 2004
Location: With the gods
Age: 40
|
I have a question about making the rounded borders.
I was following Cats' tut http://forums.animesuki.com/showpost.php?p=514863 in step 2, it says "Holding the Ctrl Key click on the image-thumbnail representing the layer mask in the Group layer. This will make a selection of it." So I created the new layer on top, clicked on it, held ctrl, clicked on the layer mask thumbnail below the layer but then when I go to edit, it doesn't allow me to stroke. What did I do wrong? Please pardon my noobness.
__________________
|
|
|
|
|
2007-09-01, 04:44
|
Link #489 |
|
sleepyhead
AuthorJoin Date: Dec 2005
Location: event horizon
|
Each layer has a picture next to it's name, representing either it's type or just a sneak peek at it's contents. When you create a layer mask you add another little picture to the layer. (it shows in black which areas are hidden)
Anyway... if, while holding down the Ctrl key, you click those images it will select all the non transparent pixels. Doing this on a layer mask basically selects all the visible portions. In layman's terms: the white stuff. To stroke something you need a selection. (the ant line thing  ) )
__________________
|
|
|
|
|
2007-09-01, 05:04
|
Link #490 |
|
Undefined
Join Date: May 2004
Location: With the gods
Age: 40
|
I have selected the new layer, and then layer mask (ie. group 1), i see the ant line but it's going around in square, not around the visible part (it's a circle).
Anyhow, I can't stroke it. I have taken a screenshot. 
__________________
|
|
|
|
|
2007-09-01, 06:31
|
Link #493 | |
|
Thinking outside the box
Graphic DesignerJoin Date: May 2007
Location: The Netherlands
Age: 37
|
Quote:
Here is a quick video i made of how it can be done. Start till end, only 1min and 13 sec
__________________
|
|
|
|
|
|
2007-09-08, 05:26
|
Link #495 |
|
Thinking outside the box
Graphic DesignerJoin Date: May 2007
Location: The Netherlands
Age: 37
|
How to extract a image
Tutorial making a render
Tutorial level: Easy. You won't need any photoshop knowledge to be able to do this. All you need to know is the basic CTRL+C and CTRL+V I won't bother with tons of screenshots. But i highly recommend you to download the video Tutorial to see how it is done. It probably won't make much sense without them. The video are only 23mb together and 1280x800 resolution, and xvid-mpeg encoded.Note this tutorial is made based on my own experience. There might be some mistakes in them, but even so. I manage to be able to do decent graphic design with it. Index - Lasso Tool explained - Lucky Star – Easy - Shuffle – Medium - Comment Lasso tool There are 3 lasso tools. 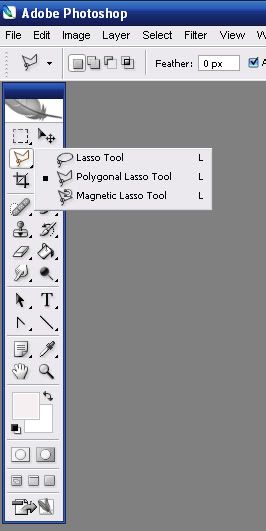 For this tutorial we will only use the Polygonal Lasso Tool, and the Magnetic Lasso Tool. The Polygonal lasso tool will be used for doing the hard parts. And the Magnetic lasso tool will be used for the easier parts. Polygonal Lasso tool The polygonal lasso tool makes straight lines. Every time you press the right mouse button it places a dot, and from there on you make another straight line. If you make enough dots you can actually make a good curve even though it’s only straight lines. I usually use it to extract hard parts. And to do hair strings. Magnetic Lasso tool The magnetic lasso tool is quite a stubborn tool to say so. To extract stuff like the Lucky Star image it’s most suitable since the thick outlines makes it easy to attach to the edges. Once you made your first start with magnetic lasso tool, and move you mouse over the edges of what you what you want to extract you will notice it makes dots automatically. Depending on how thick the outlines are, it can be really easy to use it, or painful if the outlines are very vague. Some things to know about it. you notice it makes dots on itself. If your not happy with the dot it made, press backspace to delete the last made dot. And manually place your dot with the right mouse button. That is actually the only trick to it. Other than that. You can actually do something with the settings of it. But i have yet to found out what they actually do And i’m always using default settings myself.Lucky Star Video Tutorial Link 1 Link 2 We are gone extract this img of Konata, Note it’s considered EASY. Since well, the outlines are thick black color. The difference in color is big, so the magnetic lasso tool sticks to it easily.  This is a good example of why to use Magnetic lasso tool. As you can see in the video it takes about a minute to extract it. I personally don’t know a way to do it even faster than this. After surrounding the whole thing. You press CTRL+C > New > CTRL+V. To paste the render in there. If there are some bad parts you can delete it off later. Just remember you can delete this way. But you can’t add new stuff to it, unless you redo the lasso thing with the parts you missed, and paste it there again, and move it to the right location. Shuffle Video Tutorial Link 1 Link 2 This is a Medium one. We are going to extract this image  During the video you can see that i had troubles at the top left. I just took a bit bigger. And reworked that area with the Polygonal Lasso tool. That is also the same way to do strings of hair. After surrounding the whole thing. You press CTRL+C > New > CTRL+V. To paste the render in there. If there are some bad parts you can delete it off later. Just remember you can delete this way. But you can’t add new stuff to it, unless you redo the lasso thing with the parts you missed, and paste it there again, and move it to the right location. Comment. If you have tried doing some rendering with the magnetic lasso tool, you have found out that it’s not always as easy as shown in the tutorial video. But most of the time it does work. I have extracted every sig i made using these methods. I even added the extracted render to a premade sig. Just to show you that even though the render quality isn’t good. It’s more than sufficient for signatures. If you see a mistake or so feel free to point it out by pm or in my thread or here. Feedback and comments appreciated.
__________________
|
|
|
|
|
2007-09-08, 05:28
|
Link #496 |
|
Thinking outside the box
Graphic DesignerJoin Date: May 2007
Location: The Netherlands
Age: 37
|
How to make a windows icon
Video Tutorial how to make Icons for windows(they actually work for Vista to)
Tutorial level: Easy All you need to know is how to extract stuff. See my previous tutorial for that if you don't already know how to. Software used: Axialis Icon Workshop Photoshop CS2 rar contains - 3 images used to make them - The Photoshop file - The 3 Icons that are the result of this tutorial - And the Video of course Comment In the Video i will be showing you how to make 3 icons. I picked the original images based on variety of ways to make the icon. The first one is a easy one. Since the Magnetic lasso tool sticks to the sides easily. The second one is like stealing candy from a baby. All you have to do is use the Magic Wand. The third ons is medium. It's a screencap. And actually one of the easier screencaps i did. Since i forgot i had this pic of Miki. I added the icons to the rar to. The icons haven't been posted except for the Konata icon. One important thing when choosing your source for a icon. Since a icon is in a square. The best is if the picture fits in a square. So not to many hair sticking out and stuff. Otherwise it will look cut off. And if you still try to fit it in the square by making it smaller it will be so small that you can hardly see who it is. Enough of my uninteresting talking. Let's get to the video. Link 1 Link 2 If you see a mistake or so feel free to point it out by pm or in my thread or here. Feedback and comments appreciated.
__________________
Last edited by Sephi; 2008-01-01 at 11:36. Reason: Fixed engrish! |
|
|
|
|
2007-09-09, 03:39
|
Link #497 |
|
Banned
Join Date: Aug 2007
Location: Imperial Manila, Philippines
|
I tried magnetic lasso and it sucks, especially when the edges aren't strongly defined, so I use the eraser tool, like copying the entire part then erasing the unneeded parts one by one.
How do you a girl's hair without spending at least 90 minutes brushing out every single open space between the strands? The eraser tool is a headache for the impatient. |
|
|
|
|
2007-09-09, 05:30
|
Link #498 |
|
Thinking outside the box
Graphic DesignerJoin Date: May 2007
Location: The Netherlands
Age: 37
|
Use the polygonal lasso tool for strings of hair. If you saw the tutorial video you can see i switched to polygonal on parts that are a pain to do. And meh... strings of hair are the root of evil...(rendering wise)
And i guess it depends on how the render looks. Some are suitable for magnetic lasso tool, while other require the use of Polygonal. But i manage so far I can say.. it has yet to took me more than 30min to extract a image... You can see what i made so far in my own thread. Every sig/banner/render you see has renders extracted by myself all with the use of Magnetic/Polygonal lasso tool.
__________________
|
|
|
|
|
2007-09-09, 05:49
|
Link #499 |
|
sleepyhead
AuthorJoin Date: Dec 2005
Location: event horizon
|
...or the pen tool if you want to be precise. I find it faster since it's easier to get it perfect in one go.
The eraser is the equivalent of a layer mask and a brush. The difference is that with a brush/mask you can go back at any time, while with the eraser you're at risk of not having enough Undos or Snapshots. The eraser has to be the most stupid tool in Photoshop.
__________________
|
|
|
|
|
2007-09-09, 06:31
|
Link #500 | |
|
Banned
Join Date: Aug 2007
Location: Imperial Manila, Philippines
|
Quote:
but the delicate strands give the feminine aura that I want to capture. The same goes for the ribbons, especially the long ones.
|
|
|
|
|
 |
| Tags |
| avatar, graphic, photoshop, signature |
|
|