AnimeSuki Forums

Register Forum Rules FAQ Community Today's Posts Search

Go Back   AnimeSuki Forum > Anime Related Topics > Fan Creations

Notices

Reply
 
Thread Tools
Old 2006-08-30, 10:41   Link #181
Catgirls
I am mowing clowns
 
 
Join Date: Dec 2005
The index in the first post has been updated. Thanks again to BlackCatXIII the the fine work on keeping it up-to-date.

=^.^=
Catgirls is offline   Reply With Quote
Old 2006-09-01, 23:08   Link #182
SweetHoney
~Nanchatte Renai
*Scanlator
 
 
Join Date: Mar 2006
Location: Australia
Age: 30
This tut is for people like Tea_ser who have a winny bit of trouble with animation

ok take this gif that tea made (hope you don't mind tea!)


Ok now by opening this I can see that this has duplicate frames slwoing down the animation and making it very choppy


*click thumbnail for larger pic*

Ok so now we delete the duplicated frames making the animation now looking like this


Now change the time of the frames it is set on to something that won't make it so choppy

I choose this to be the time set for the animation


If you don't want to go frame by frame changing the time just go to that little arrow thing on the right and click selcet all frames the choose the time you want like you would be doing it one by one but don't click on the picture but on the bottom where it displays the time

ok then you should follow Pell's tut. on making gifs loop and ta-da I got this as a result


Or you can follow that thorugh but don't do pell's loop tut and use the tween tool which is this and put these settings *the one with the black mark around it is the tween tool.


And for the settings


For OMG it is slow tween

Do not worry about this just change these frames to the others say like 0.14

Pic for OMG it is slow


just click on were the time frame set time is and put 0.14 like the other frames but the first and you should end up with this


End result with the tween effect


Hope this helps anyone
__________________
SweetHoney is offline   Reply With Quote
Old 2006-09-15, 16:19   Link #183
purplehippie
Junior Member
 
Join Date: Sep 2006
siggies

i've trying and trying for days to figure out how people got those sort of transparent images beside a normal image on there siggies. can any1 help me?
purplehippie is offline   Reply With Quote
Old 2006-09-15, 16:22   Link #184
watery
¤ simply h0t baby ;D
 
 
Join Date: Sep 2006
Location: Germany
Oo the cloud in the bg makes me dizzy, maybe u should take the same bg in every pic (since its not enough pics to make the cloud go by in a nice way q-.q)

*slaps herself*
watery is offline   Reply With Quote
Old 2006-09-29, 17:22   Link #185
Potatochobit
Certified Organic
 
Join Date: Dec 2005
is there a guide anywhere about vector tracing? i havnt done any yet but i was thinking it would be very useful to clean up some pics
Potatochobit is offline   Reply With Quote
Old 2006-09-30, 04:08   Link #186
KiNA
Kira_Naruto, the ecchi
*Graphic Designer
 
 
Join Date: Dec 2005
Location: http://www.exciting-tits.com/
I give you 2 link that been helping me ^__^

Basic Vector Tracing

-AND-

More Advance one


@ purplehippie
Quote:
i've trying and trying for days to figure out how people got those sort of transparent images beside a normal image on there siggies. can any1 help me?
You cut them out from the source first .. look for my tutorial or dragonwing tutorial or Jevony's on how to extract out pic ^__^ .. part (C) in the index at 1st page
__________________
“This be the realest shit I ever wrote.” ~Tupac
So very dead right now.. but still breathing thank you.
Top 4 Manga Waifu
>> Tsukiumi
>> Saeko Busujima
>> Himuka
>> Yui Kotegawa


KiNA is offline   Reply With Quote
Old 2006-10-03, 01:24   Link #187
saphyre
Senior Member
 
 
Join Date: Jul 2006
Location: Australia
Age: 36
Being a newbie at Photoshop and all...I finally managed to get a rounded border after fiddling around with Photoshop, which looks something like this...
But even though you can't really see it, that sig still has a white rectangled border as well as the bolded round border...
Any tips on how I could remove that rectangled one?
Also which version of Photoshop do people use to make sigs?
I've been reading a few of the tutorials and can't seem to find some of the buttons mentioned in them.

Thanks in advance for your help.
__________________
saphyre is offline   Reply With Quote
Old 2006-10-03, 02:35   Link #188
KiNA
Kira_Naruto, the ecchi
*Graphic Designer
 
 
Join Date: Dec 2005
Location: http://www.exciting-tits.com/
When you make a new document .. make sure its a transparent BG .. not white ^.^
__________________
“This be the realest shit I ever wrote.” ~Tupac
So very dead right now.. but still breathing thank you.
Top 4 Manga Waifu
>> Tsukiumi
>> Saeko Busujima
>> Himuka
>> Yui Kotegawa


KiNA is offline   Reply With Quote
Old 2006-10-03, 02:52   Link #189
saphyre
Senior Member
 
 
Join Date: Jul 2006
Location: Australia
Age: 36
Oh it was that simple.. LOL thanks alot
__________________
saphyre is offline   Reply With Quote
Old 2006-10-03, 05:07   Link #190
KiNA
Kira_Naruto, the ecchi
*Graphic Designer
 
 
Join Date: Dec 2005
Location: http://www.exciting-tits.com/
Welcome..

btw most here used photoshop cs2 .. at least I do, and most the tutorial is geared toward PS CS2.

EDIT: fine, Riker said I lied .. because he used Image Ready for his sig >.> ..... I said MOST ....

...

...

...

EDIT2 : Fine .. so is sweet honey .. she's using IR as well.

OK.. now I'm the only one using PS CS2 ..


__________________
“This be the realest shit I ever wrote.” ~Tupac
So very dead right now.. but still breathing thank you.
Top 4 Manga Waifu
>> Tsukiumi
>> Saeko Busujima
>> Himuka
>> Yui Kotegawa


Last edited by KiNA; 2006-10-03 at 05:22.
KiNA is offline   Reply With Quote
Old 2006-10-04, 10:21   Link #191
saphyre
Senior Member
 
 
Join Date: Jul 2006
Location: Australia
Age: 36
For Kira_Naruto's 'Cutting Render with Quick Mask' Tutorial here, I managed to do everything up until near the end, where you switch the foreground and the background to delete the parts you don't need. For some reason my one doesn't delete anything.

Anyone know the reason why?
__________________
saphyre is offline   Reply With Quote
Old 2006-10-04, 11:22   Link #192
KiNA
Kira_Naruto, the ecchi
*Graphic Designer
 
 
Join Date: Dec 2005
Location: http://www.exciting-tits.com/
Explain "doesn't delete" ... make sure that your brush is now white.

quote the part where you stuck, I'll see if I can explain better
__________________
“This be the realest shit I ever wrote.” ~Tupac
So very dead right now.. but still breathing thank you.
Top 4 Manga Waifu
>> Tsukiumi
>> Saeko Busujima
>> Himuka
>> Yui Kotegawa


KiNA is offline   Reply With Quote
Old 2006-10-04, 11:54   Link #193
saphyre
Senior Member
 
 
Join Date: Jul 2006
Location: Australia
Age: 36
"Now this is what I say we gonna get up close and personal.. Press X to switch the foreground and background .. using white now right, now brush over the part you dont want .. white is the delete option for quick mask .. so just go over the outer rim.. leaving the hard part (like her hair) for later .."

I switched it from black to white and by the 'delete option' i assumed you meant removing the blue bits (on your pic) that went outside the edges... If you know what I mean. :O
__________________
saphyre is offline   Reply With Quote
Old 2006-10-04, 16:17   Link #194
KiNA
Kira_Naruto, the ecchi
*Graphic Designer
 
 
Join Date: Dec 2005
Location: http://www.exciting-tits.com/
hmmm ... look at your history panel .... make sure you are not out of quickmask yet....

Also, make sure your tool is still the brush

Those are 2 thing that I'm assuming here at 5 am in the morning ..
__________________
“This be the realest shit I ever wrote.” ~Tupac
So very dead right now.. but still breathing thank you.
Top 4 Manga Waifu
>> Tsukiumi
>> Saeko Busujima
>> Himuka
>> Yui Kotegawa


KiNA is offline   Reply With Quote
Old 2006-10-05, 00:12   Link #195
saphyre
Senior Member
 
 
Join Date: Jul 2006
Location: Australia
Age: 36
I did exactly the same as what I did last time and now it works :S weird lol.

EDIT: another problem. *sigh* It's about those rounded borders again...
I'm very sure I selected transparent this time... But it still shows up like this (the corners are still there... just cant see them because it's white).
__________________

Last edited by saphyre; 2006-10-05 at 01:52.
saphyre is offline   Reply With Quote
Old 2006-10-05, 09:57   Link #196
felix
sleepyhead
*Author
 
 
Join Date: Dec 2005
Location: event horizon
Quote:
Originally Posted by Kira_Naruto
OK.. now I'm the only one using PS CS2 ..
Sorry... but you're NOT... I use Photoshop Creative Suite 2 too
I use IR just for the really basic operations... but I always go to PS afterwards... even if I don't do nothing else in it but save the file I still go to PS... it's a lot more familiar to me.
__________________
felix is offline   Reply With Quote
Old 2006-10-10, 17:58   Link #197
felix
sleepyhead
*Author
 
 
Join Date: Dec 2005
Location: event horizon
Quote:
Originally Posted by saphyre View Post
I did exactly the same as what I did last time and now it works :S weird lol.

EDIT: another problem. *sigh* It's about those rounded borders again...
I'm very sure I selected transparent this time... But it still shows up like this (the corners are still there... just cant see them because it's white).
I don't really understand... You probably just had a layer beneath it that was white
Anyway I suggest saving them as 24-PNG... Lots more quality
Gifs chop away little bits here and there.

If you want some exterior transparency to x color gradient, then 24-png is a must, otherwise you'll get white instead of transparent.
__________________
felix is offline   Reply With Quote
Old 2006-10-14, 23:53   Link #198
jackal777
~Bishoujo-Fetish~
 
 
Join Date: Jul 2006
Age: 34
does anybody know how to make borders like cyz current sign??? thx a lot ^^
jackal777 is offline   Reply With Quote
Old 2006-10-22, 00:41   Link #199
Xellos-_^
Not Enough Sleep
 
 
Join Date: Nov 2003
Location: R'lyeh
Age: 48
could someone tell how to reduce the bitsize of a gif?
__________________
Xellos-_^ is offline   Reply With Quote
Old 2006-10-22, 18:32   Link #200
felix
sleepyhead
*Author
 
 
Join Date: Dec 2005
Location: event horizon
Post Making an Avatar : A to Z

Spoiler for Original Replyies:
------------------------------------------

S.E.
Structure Explanation..

I added explanations, solution to problems or simply simple alternatives while I was writing it. These are indented and marked as optional etc. Info are optional pieces of information; in case you don't understand what you're doing, and want to know. The Full-Screen-View is a link to a really big Screen Shot in case you don't know where the elements in the little images are.

Info 101
Example Used..

Lets say I would want to make an Avatar with the folowing specifications: Kanon; Ep3 (by a.f.k.); 8.36-6.37 : when Yuiichi makes the cat-like smile..

Step 1
VirtualDub..

I open VirtualDub.. (so I may grab the frames)
First I have to open the file. I go File > Open Video File > * search for "Kanon 3" > Open..
------------------------------------------------
Solution For Posible Error
Upss, it would appear I have a error. Missing whatever xvid something. Oke, I just install XviD, problem fixed ^_^
I go back and try again to open Kanon 3..
------------------------------------------------
------------------------------------------------
Extra Info
To create an animation, you display several images one after the other at a certain time interval. The images used to create the animation are called "frames".

Frames are usually ordered from left to right. In a .gif (wich stands for Graphics Interchange Format; and is pronounced "Jiff") once the animation reaches the last frame it will go back to the first and the animation will start over, by default, you can make it so the animation stops at the last frame or that it stops after a certain amount of loops.
------------------------------------------------
Step 2
More Vb..

Now that I have opened my file ("Kanon 3 form a.f.k.") I'll start the process of grabing my frames.
--------------------
Extra Explanation
As in extracting the images I'll need to make the animation.
--------------------
I'll first go to point where the animation supposedly starts.

Full-Window -View
Tip - Use the Arrow-Keys for baby steps.
----------------------
Then I just press this little button..
----------------------
Then I search for the last time and move the little bar there.. (the animation is very small so I it barely moves..) (note the little difference in time)
----------------------
Then I press "That-Little-Button".. (note that after you press it the number of frames you have selected will be displayed)
----------------------

Ok.. now we have all our frames selected,
lets start saving then and loading them in ImageReady.


Step 3
Saving..

Go to your Desktop (Don't close VirtualDub; minimize it) Now create a new folder on your desktop called "New Folder". Go back to VirtualDub (maximize it back) go to Files > Export > Image sequence... (in older versions of Vb (pre 1.7.0): Files > Save image sequence...), Okey.. now use These-Settings. Then click OK
* a little window appears as the frames are saved in the folder called "New Folder"

After it finishes you can close VirtualDub.

Open ImageReady (it comes with PhotoShop BTW)
First go to [u]Window[u] > Workspace > Interactivity Pallet Location.. now you should have all the windows you need to make a gif..

Let's open all the frames you saved earlier in VirtualDub.
Go to: File > Import > Folder as Frames... > *select "New Folder" from your desktop.. > OK
Now you should have something to work with (Ex:Screen-Shot).
Time for the fun stuff..

Step 4
IR fun..

First we need to separate the useful bits. We also need to make the image a nice square. To do this we select the Crop Tool.. (just press C to select it) Now holding shift drag a nice square covering what you want in the animation.. For example >>>>>

The problem here is that if I select frame 15 (that also has some subtitles in it) I notice that some ugly text is in the animation (Screen-Shot.. so.... I don't crop it that way. Instead I select a frame with some subs in it (if no frame has subs in it, like in the case of RAWs, you are lucky ) now I make sure that my selection box is above the subs. (Ex: ScreenShot)

After you've made a nice selection, press Enter (on your keyboard) and you should have only the part of the image you selected.

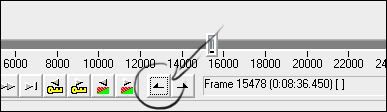
Step 5
Nuking the Dups..

But there are a lot of useless frames.
For example, in my animation Frames 1 to 5 are exactly the same. There's no point in keeping them all, so I delete 4 of them. Same goes for every other duplicate.
---------------------------
Extra Info
If you want to keep as much of the original animation as posible and aren't very good with timing, count the frames. So if you have 5 identical frames (one after the other) you delete 4 and set the time on the fifth to 0.05 (I'll talk about how to set the time in a few moments). If it's a single frame you set it to 0.01.. etc..
---------------------------
You deleted all the duplicate frames but there's still the matter of timing.. You'll notice that in the Animation Pallete (Pallete = Window) bellow the image of each frame there's a little number, you should see something like "0 sec." this means that the frame will display for 0 seconds, then the animation will move to the next frame, it's best to set this to "0.01 sec." To do this: * left click 0 sec. > Other > *type in : .01 or 0.01 ; it's the same thing > *Press Enter The same applies to change to any other value.
--------------------
Extra Info
In some cases 0 sec. would result in a slower animation then 0.01 sec. So 0.01 is recommended..
--------------------
Step 6 --- Optional
Looping..

Ok so now we have a nice little animation, but it doesn't loop right. The way it is now Yuiichi would make the cat-smile and then his mouth would flash back to normal. NOT Good enough, we need to make it loop.
Ok, This is what I start with.

(the frames I'm left after I removed all the duplicates)
I select the first frame.
Now Holding Shift I select my last Frame.
Now with my Frames Selected I press this little button to clone the frames in my selection.
With my frames duplicated and still selected I press this little button.

(It looks different depending on the windows skin.. but it's always in the same position)
From the menu that pops up, I press Reverse Frames this will reverse the frames in your selection.
Ok now I need to delete 2 duplicates in my selection (the first and last frame in my selection are duplicates) (just think about it.. you'll figure out why..) So I select the first frame in my selection.
Now holding Ctrl I select the last frame.
Now, to delete them, I press the Recycle-Bin icon.

Ok now I have my animation nice and smooth, ..hmm.. but it's not quite how I want it. If I leave it like this it Yuchi's mouth will just change too fast. I want 2 little pauses for a little effect So I set the time for Frame 1 to 2 sec. and the time for Frame 7 (when the cat-like-smile is biggest) to 3 sec. Like this:

So now I have a nice little loop..

If you ever have a blinking avatar then you probably have something like 3 frames duplicate those 3 frames 2 times (don't reverse them) and select slightly different timing for them, for a more realistic effect.[/i] ]

Here's something to keep in mind:
(these are after removing duplicate frames)
If your animation is left with..
  • 13 or less frames - then your good, you might only need some little extra optimizing but you should have some really high quality gif
  • around 40 frames - cutting it really close, but it's within posibility..(usually).. expect serious optimizing ahead.
  • more then 40 frames - trouble, you'll need to cut frames out. A nice way is to cut certain scenes or if you don't want to mess it up too much cut the 2nd or 3rd. For example: if my animation is 1 2 3 4 5 6 7 8 9 10... (were the numbers are the frames)... if I cut the 2nd then the animation would look like this 1 3 5 7 9... or, if I cut the 3rd instead, then the animation would look like this 1 2 4 5 7 8 10... Choose depending on how many frames you think you have to cut to reach a reasonable number of frames.. (3rd for less, 2nd for more; you can also repeat the process over and over.. but you might cut too many..)

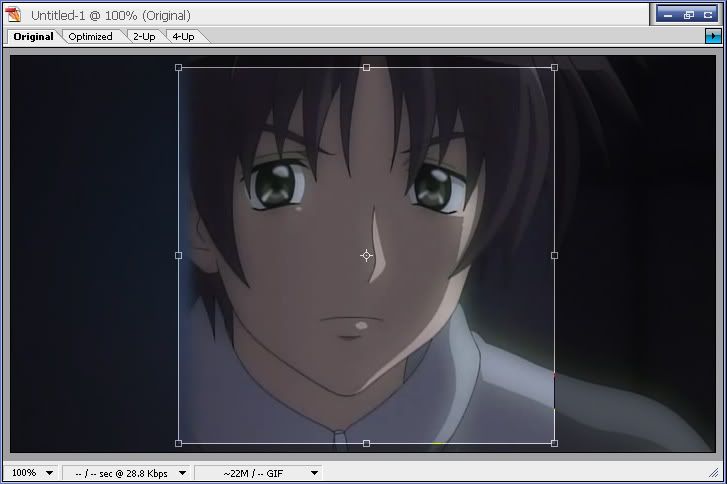
Step 7 ---optional
Brightning steps ahead..

Okey... We solved some of the problems but it's a little too dark (for my liking at least). It's time to go to PhotoShop.

Click this button.. (or press Ctrl+Shift+M)

You should have something like this : ScreenShot.
-----------------------
Error
If you don't.. then go Window > Workspace > Default Workspace
-----------------------
Ok.. now we are missing the Animation Pallet (window)
Go to Window > Animation
Now you should have something like this : Screen Shot

Now select a frame of intrest, for example I selected frame 7 since it has a 3 sec. delay. So it's going to stay on the screen a lot. Now in the Layer Pallet, select the top most layer. Like so..
----------------------------------
Extra Info
Layers are basically the images in an animation. The order layers are in isn't important. (since the frames don't care)

A frame is basically a little data bank. It remembers what layer is visible at what given time, and how visible, as in opacity.

Layers are used to.. for example if you wanted to make a Bleach wallpaper and you had a nice scan of Ichigo and a cool empty background, you would take your picture of Ichigo and place it on one layer and your background on another layer, then you would move (in the pallet) the layer with Ichigo so it's above the layer with the background.

Layers follow the same logic as in the real world. So what's above is visible.. what's bellow is blocked by what's above, so if the above layer "has holes in it" ~sora speak you can see thru them to the bottom layer.
----------------------------------
Time to get back to photoshoping..
With your top layer selected.. Layer (the menu) > New Adjustment Layer > and.. (youl'll do this several times so I just made a list)
  1. Levels - The left White-Arrow to increases the darkness, the middle increases/decreases the brightness (right = brighter)
  2. Curves - Too much time to explain. Just think of this as your little toy. S curves are easy and nice. (the make your image glow)
  3. Color Correction - Another lil' toy.

    And there is also several other options. Try not to overdo it..

Before(left) --- After(right)
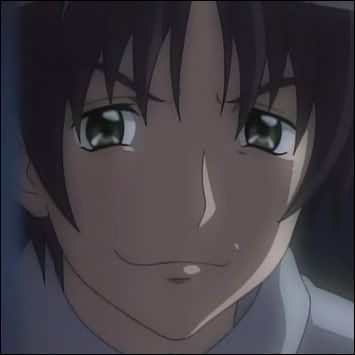
.

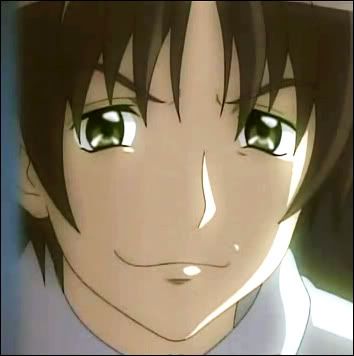
Step 8
Downsampling..

Now that that's done and over..
Go to Image > Image Size
Now, in the drop-down-menu where you currently have "Bubilic" select Bubilic Smoother (for the most efficient (bit wise) image reduction method) or you could chouse Bubilic Sharper for better quality. Next, go to the Width field and write "100". Click OK..
Now your image should be avatar size (100 x 100 pixels)

Step 9
Border lovin'

Now for the border..
There are different types of borders..
  • Simple 1px black border - Create a new layer, via this button ...then press Ctrl+A ..now go to Edit > Stroke > Use these Settings
  • 1px color border with color border (Cyz type) - Create a new layer (see above) Ctrl+A, now Edit > Stroke, use these settings.. now hold Ctrl and click on the image next to the layer name of the layer that contains the border.. go Edit > Stroke and use these settings.. Now Ctrl+A.. and go Edit > Stroke with these settings.
  • Woland Style.. - make random asymmetrical selections all over the image.. (using the Rectangle Marque Tool, press M to get it) now go Selection > Save Selection > *type a name* > OK.. now Group all your layers (Select all the layers and press Ctrl+G), select the group folder.. press the layer mask button (in the same place where the "New Layer" button is, 3rd from the left..) create a new layer, now go to Select > Load Selection... > *chouse the selection your saved earlier* > OK now using this selection apply any type of border you like (recommended : 1px color border)
  • Standard Double-Border - make a 2px color border then a 1px color border over it.. tada..
    etc..

The thicker the border the more optimized (bytes) your gif is .. borders made from complex selections (woland type) are very byte efficient..

Step 10
Finishing the job..

Now's time to save it..
Go File > Save for Web...
You should see something like this... The objective here is to get it under 50k. Since my animation sequence is small (12 frames) there's little to no optimizing to be done.

For something like a 40 framer. Try something like Selective/40-50 colors/10 loosy or something smaller. The drop in quality should be.. uhh.. acceptable.. Example-Output

Once you're satisfied select Save and give it a name and location.. and your all done.


Don't worry.. you'll forget it all soon enough....

---------------------------------
Mics. Stuff ---optional
More guides..

>> Tweening.. (to get nice loop)
Tween is generally more usefull with text layers but anyway..
Version 1 - Lets say you have a 8frame animation. * Select Frame 1 > * Duplicate > * drag Frame 2 until it's Frame 9 > * select frame 8 > * Tween (set Frames to add to 3) > OK
This is better if you have 2 or more short animations 1 after the other and want to separate them..

Version 2 - Lets say you have a 12frame animation. * Move the layer for Frame 1 next to the layer for the Frame 12 > * Duplicate Frame 12 > * Select Frame 12 > * make the layer for Frame 12 and the Layer for Frame 1 visible > * do the same for Frame 13 > * Select Frame 12 and the layer for Frame 1 > * Using the move tool (Press V) move the image down until you can't see it (if the layer is under the layer for Frame 12 then disable visibility, for the layer for Frame 12, to make it visible) > * Do the same for Frame 13 only this time move the layer for Frame 1 Up > * tween (Set Frames to Add to something like 5 frames) > OK
You should have something like this..


And the Result.. (I added 1px black line between the rolls..)

To get it Up-Down, Left-Right, Right-Left.. same idea as above..

Version 3 - Create a new layer.. go Edit > Fill > * Use Black or White > * Duplicate it (* right click it > Duplicate Layer) > * Move them so they're above all layers except the border(s) > * Make them visible in all the frames (use Visibility and Lock > * Move one to the extreme-left and the other to the extreme-right (so they're not visible) > * Create a new Frame > * Move them back (so they're visible) > Tween > * 5 Frames or so > OK > * Delete some of the frames that look the same... all done.. you can't do this on the y-axis.. etc..
>> Layer Masks
Duplicate the last layer several times. Duplicate the last frames several times. Make the first layer visible in all of them. Make a sligltly bigger layer mask in each of the layers. Make every one of the frames you made (duplicated) corespond with one of the layers you made. All done.
Here's an example-result..
__________________

Last edited by felix; 2007-05-18 at 08:07. Reason: Fixed Glitch..
felix is offline   Reply With Quote
Reply

Tags
avatar, graphic, photoshop, signature


Posting Rules
You may not post new threads
You may not post replies
You may not post attachments
You may not edit your posts

BB code is On
Smilies are On
[IMG] code is On
HTML code is Off

Forum Jump


All times are GMT -5. The time now is 23:39.


Powered by vBulletin® Version 3.8.11
Copyright ©2000 - 2024, vBulletin Solutions Inc.
We use Silk.